
Sending emails from your own email domain with Email Creator
By default, when using the Email Creator, emails are sent from the @disco-mailer.net domain. However, if preferred, it is possible to change the sender email to your own custom domain.
At a glance
We are often asked:
Why is the default domain @disco-mailer.net?
This has to do with email authentication. Every time an email is sent, the recipient's email server attempts to authenticate the sender's message before passing it along to the recipient's inbox. If the sender's message fails authentication, the server may send it to spam or not deliver it at all.
Authentication failure is often caused by a discrepancy between the sender's email domain (in our case @disco-mailer.net) and the domain of the email address entered in the "From" field. This is called domain authentication failure.
To avoid domain authentication failure, we send emails from the @disco-mailer.net domain rather than your actual email address. This is because if we were to use your actual email address without permission, it is very unlikely that your emails would be delivered to the recipients.
Using your own custom domain
If you'd like to have the emails you send out from Email Creator be sent from a different email address (using your own custom domain, e.g. @yourbusiness.com) you will need to give our mail servers permission to use your email address by setting up custom domain authentication. This process can also help if you find that your emails are frequently delivered to your recipients' spam folders, or they are not being delivered at all.
Authenticating your custom domain
| 📎 Note: This process is quite technical and requires that you have access to your DNS (Domain Name Service) provider's control panel. Your DNS provider may be your webhost or it may be a third party. If you're unsure, we suggest reaching out to your webhost directly. If you don't have access to your DNS provider's control panel or you're not sure if you have access, contact your webmaster or a member of your IT team. If you have any questions about this process, don't hesitate to contact our Support team. |
Step 1: Adding CNAME Records
The process for adding CNAME records varies depending on which DNS provider you use. We suggest checking your DNS provider's documentation or contacting their support team for specific instructions. You can also find links to the relevant documentation for a few common DNS providers at the bottom of this page.
- Log into your DNS provider's control panel.
- Locate the area of where you update DNS records. The name of the area varies by provider; it may be called DNS Manager, Zone Editor, Domain Manager, or something similar.
- Add the following CNAME records, replacing YOUR-DOMAIN.COM with your own actual domain:CNAME host recorddestination
s1._domainkey.YOUR-DOMAIN.COMs1.domainkey.u5958710.wl211.sendgrid.nets2._domainkey.YOUR-DOMAIN.COMs2.domainkey.u5958710.wl211.sendgrid.netdsc-mailer.YOUR-DOMAIN.COMu5958710.wl211.sendgrid.net
| ❗️ Important: Some services, such as GoDaddy, automatically append your domain at the end of any host records you add. For example, if you were to enter "s1._domainkey.cooltunes.com", it would result in a CNAME host record of "s1._domainkey.cooltunes.com.cooltunes.com". Look at existing host records on your control panel. If they don’t include your domain URL, then you only need to enter everything to the left of “.YOUR-DOMAIN.COM” (e.g., "s1._domainkey" instead of "s1._domainkey.cooltunes.com"). |
| 📎 Note for Cloudflare users: When adding CNAME records, make sure that you turn off the "Cloudflare Proxy" setting for the CNAME records that you're adding. Refer to their documentation for more information. |
Step 2: Verifying CNAME Records
Once you've added your CNAME records, it can take up to 8 hours for the new records to propagate (or take effect), though most often they propagate in less than an hour. Unfortunately, there is no way to speed up this process and nothing can be done on our end until it has been completed.
You can confirm that your new records have propagated using this tool:
- In the Domain field, enter
s1._domainkey.YOUR-DOMAIN.com(replacingYOUR-DOMAINwith your actual domain). You do not need to change the other fields. - Click the Look it up button.
- If the ANSWER section includes the text
s1.domainkey.u5958710.wl211.sendgrid.net.then congratulations your CNAME records have propagated!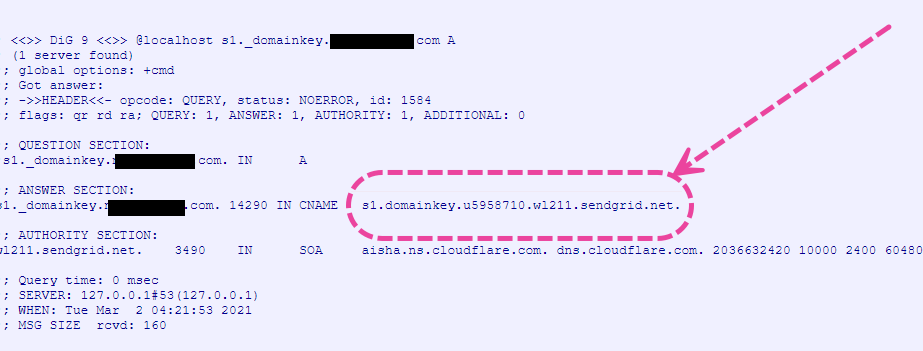
Step 3: Contact DISCO Support
Once you've verified that your CNAME records have propagated, contact our Support team so that we can take the final steps in setting up your DISCO to send emails using your own domain.
You can also reach out if you have any questions along the way, we are always happy to help! 😊
Frequently Asked Questions
Do I also need to manually add an SPF TXT record?
You do not. By adding CNAME records to your DNS configuration, you are pointing your domain to one of our email system's domains. Your domain will automatically inherit the correct SPF records.
DNS Provider-Specific Documentation
Here is a list of documentation on adding DNS records for a few of the more popular DNS providers: